Saturday, 15 February 2014

How to pass values between pages within a task flow and other task flow using pageFlow and request scope

I have scenario to pass value from one page to another page within a task flow or may be other task flow.
ADF provides some scopes for example, pageFlow, request, session and application. Using some of these scopes we can hold the value of variable throughout the application.

In this post we will see how to use pageFlow and request scope. 

pageFlow scope is used to pass parameter between the pages within a task flow. 
request scope is used to pass parameter to another page which is there in different task flow.

I have 2 pages in a default unbounded task flow(first task flow), page1 and page2. I have created one bounded task flow(second task flow) which has one page fragment ie page3.

Unbounded Task Flow
 Bounded task Flow


Create the pages by double clicking on each node in the task flows.
Two pages and one fragment gets created
page1.jspx(or .jsf)
page2.jspx(or .jsf)
page3.jsff


In page1 i have one text field(username) and one button. When i click on submit button page2 will be shown.
Page 2 has one output text field to show the value entered in the page1 and one region. The region contains the contents of the other task flow(ie page3).

In the page1 bind the username to some existing managed bean, if not create new one and bind it(i have created one with the name testScopeBean and make sure that the bean scope is pageFlow in the task floew ie adfc-config.xml). It will create getter and setter methods. And create one instance variable where you want to store the value of the username. And generate the getter and setter methods for the instance variable(scopeVariable)


On click of submit button call the actionListner and store the value of username into the scopeVariable in the testScopeBean.
Managed bean code is show below.


public class TestScopeBean {
    private RichInputText username;
    private String scopeVariable;

    public TestScopeBean() {
    }

    public void setUsername(RichInputText username) {
        this.username = username;
    }

    public RichInputText getUsername() {
        return username;
    }
    
    public void setScopeVariable(String intVar) {
        this.scopeVariable = intVar;
    }

    public String getScopeVariable() {
        return scopeVariable;
    }

    public void getUserName(ActionEvent actionEvent) {
        // Add event code here...
        RichInputText userName = (RichInputText)FacesContext.getCurrentInstance().getViewRoot().findComponent("it1");
//it1 is the id of input text field
        String userName1 = (String)userName.getValue();
        System.out.println("user name "+userName1);
        setScopeVariable(userName1);
    }
}

Now you can use the scopeVariable in the other pages within a task flow like
af:outputText value="pageFlow scope variable #{pageFlowScope.testScopeBean.scopeVariable}"  id="ot1"/>

Run the page1.jspx and enter the user name and click on the submit button you can the result in page2.jspx.

You use the same pageFlow scope variable in other task flow also, but it will show blank value. Because pageFlow Scope value is restricted to only within task flow


Now change the managed bean scope to request in the adfc-config.xml managed bean tab.
The request Scope variable can be access like #{testScopeBean.scopeVariable}
Change the the wherever you have used the #{pageFlowScope.testScopeBean.scopeVariable} to #{testScopeBean.scopeVariable}.

Run the page1.jspx again and see the result, now it will show value in other task flow also.


Friday, 17 January 2014

Deleting the child records when the master records gets delete

We go for association when there is relation between the two tables. For example Order and Order Items. When we delete the Order then Order Items under that Order should get delete.  How can we achieve this?. There is an option provided by the ADF framework  association called "Implement Cascade Delete". Just we need to select that option, automatically the ADF framework will handle the master-child record.

First create the associations between the order and Items, if the association did not get create while creating the Entity Objects for the Order and OrderItems as shown in the below image


After creation of Association, open the association, go to the Relationship tab and expand the Behavior options at the bottom. Select the Composition Associations check-box, then select the Implement Cascade Delete check-box as shown in the below image .


Now if you delete the master record, automatically the child record gets delete.

Saturday, 23 November 2013

ADF View criteria Execution Modes

What are the different types of Execution Modes in ADF

There are 3 types Execution modes fro a view criteria that can be helpful in filtering out the data

1) Database: The search results are filtered from the Data base table every time the query is hit.

2) In Memory: The results are filtered from the VO cache memory. It will use the rows which are already in the row set. It will stop the unnecessary hits to the DB.

3) Both: The results are filtered from the existing row set and also from the filtered results from Database. This is useful when you want to filter from uncommitted records also.

Below scenario will explain the different types Execution Modes.

I have search criteria and result component as table to show the results. 

1) Execution Mode is DataBase in view criteria.
    There are 2 employees by the first name Steven. When we search for Steven it will show 2 records as          shown below.


I will add one more employee with the name Steven Gerrard, without saving i will search for Steven, it will show only 2 old employees.

2) Now changes the Execution Mode to 'Both' in the employee view criteria. Add new Record with the name Steven Gerrard, and do not commit the record into the DB, it will be in VO cache memory


3) Now search for Steven, it will show all the 3 Steven records. 2 from the DB and one from the VO cache memory as shown in below image.


Wednesday, 18 September 2013

ADF Tree table component

How to show the Master -child data in Tree structure in ADF.?

ADF provides one simple component by ADF Tree Table component, using this this component we can show the data in Tree structure.

Consider Employee Department relationship. We will show the list of employes for a department.

1) Create the view link between Department and employee, then you can see the viewlink AM Data Model.

First move the DepartmentVo to right side, and then move the View link under the DepartmentVo, it will look like below screen shot.


Now you can see this master-child relationship in the data-control.

2) Drag and drop the Deprtment table from the data-control to the jsff page as ADF Tree Table as shown below.

Once you drag and drop as ADF Tree Table, Add the Employee to the Department as shown below. At the beginning the Target Data Source is blank for both Department and Employee, we need to add the iterator into the bindings and then we need to add the Target Data Source.


3) Go to the Bindings and go to the Executables Add the iterator for the Child entity  ie Employee


4) Now go the bindings, edit the Department, and add the target Data Source using EL pIcker as shown in below image. Similarly add the Target Data Source for the Employee.


Now run the page and see the UI , you will see the Employee Name under each Department.


Thursday, 5 September 2013

Switche the componenets between list of components in ADF


Switcher component is used to switch the components between the list of two or more components.

For example i have 2 Graphs(Bar Graph and Pie Chart) and i want to switch between the two graphs.

I have drop down with the with two options 1) Bar Graph 2) Pie Chart

By default Bar graph is shown, and when the user selects Pie chart, the corresponding chart will be shown.

First create drop down with the with two options, Bar Graph and Pie Chart

 <af:selectOneChoice label="Choose Graph" id="soc1"
                        binding="#{HeadersTableTaskFlowBean.chooseChart}"
                        autoSubmit="true">
      <af:selectItem label="Bar Graph" value="BarGraph"
                     id="si2"/>
      <af:selectItem label="Pie Chart" value="PieChart" id="si1"/>
    </af:selectOneChoice>


1) Add one Switcher component into the fragment, and insert two facet(f : facet) inside the Switcher, name each with the proper names.

2) Insert panelBox into the each facet. drag and drop the VO from the data control and create bar graph into the 1st panel box, and drag and drop the VO, create the pie chart into another panelBox.
    The Structure of the fragment looks like below image.


3) Go to the property inspector and select the DefaultFacet from the Drop down as shown in the below image.


4) Add Bindings to the Switcher components , it will create setter and getter methods in the managed bean, so that we can change the default Facet dynamically.


the below code gets create in the managed bean

  private UIXSwitcher graphSwitcher;

    public void setGraphSwitcher(UIXSwitcher graphSwitcher) {
        this.graphSwitcher = graphSwitcher;
    }

    public UIXSwitcher getGraphSwitcher() {
        return graphSwitcher;
    }


4) Add valueChangeListener to the selectOneChoice, in the same managed bean.

 <af:selectOneChoice label="Choose Graph" id="soc1"
                        binding="#{HeadersTableTaskFlowBean.chooseChart}"
                        autoSubmit="true"
                        valueChangeListener="#{HeadersTableTaskFlowBean.changeGraphs}">

 changeGraphs is the method created in the managed bean.  In the valueChangeListener method get the new value from the drop down, set the defaultfacet and Facetname, and add the partial triggers.
 
 Below is the code 

 public void changeGraphs(ValueChangeEvent graph) {
        // Add event code here...
        String str = (String)graph.getNewValue();
        this.graphSwitcher.setDefaultFacet(str);
        this.graphSwitcher.setFacetName(str);
        AdfFacesContext ctx = AdfFacesContext.getCurrentInstance();
        ctx.addPartialTarget(graphSwitcher);      
    }


By default it will show the bar graph, as we have choosen the defaultFacet as BarGraph


And when we select the pie Chart from the drop down, it will show the pie chart.


Tuesday, 3 September 2013

How to generated default values for the PK's

If we want to generate the default values for the PK's, there are many options to do that. I will show in 2 ways to generate the PK's


1) Open the Entity Object, and select the unique option and Primary Key option as show in the below image
It will generate the Random numbers, starting from 1.


2) If you want to generate the numbers sequentially not randomly, use sequences. Follow below steps to generate default values for PK using sequences.

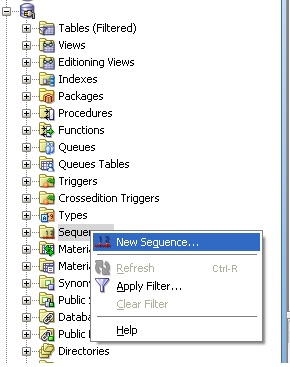
i) Go to the SQL Developer, expand the DB and right click on the Sequncee to create new sequence as in shown below image.
ii) In the opened sequence pop-up, specify the values as you want . Press OK to complete.


iii) Now create a trigger fro the sequence which you have created.

CREATE OR REPLACE TRIGGER department_pk
       BEFORE INSERT
        ON Department
              FOR EACH ROW
                  BEGIN
                        SELECT SAMPLE_SEQ.nextval
                        INTO :new.Department_id
                  FROM dual;
                  END;


department_pk is the trigger name, Department is the table name , SAMPLE_SEQ is the sequence we have created. Department_id is the PK column name

iv) Now go to the Entity Object. open the attribute, and select the data type as DBSequence, then you can see the option to enter the Sequence name which you have created at the DB side. Enter the DB sequence name and press Ok.


And you can start using it.


Wednesday, 3 July 2013

Conditional based Enabling and Disabling the fields in ADF

I have requirement to make the Text field as enable and disable based on the results of the other fields.

I have drop down with the values, and text box side to it. In ADF for LOV's we cannot enter the user inputs.

Below image describes the UI which i want.

When i select the any of the Environment, the text box needs to be disabled, when i select the blank value, the text need to be enable to enter the use inputs.
 We can achieve this by below steps.

1) Go the binding property of the textField, and bind it to the Bean class. In the bean class Setters and getters methods gets create

Textfield Code in jsff

  <af:inputText label="" id="it2"
                disabled="#{bindings.StringValue1.inputValue != ''}"
                binding="#{backingBeanScope.SampleBean.hostNameText}"/>
        </af:panelFormLayout>

  Bean class Code after binding the textfield.

   private RichInputText hostNameText;

    public RichInputText getHostNameText() {
        return hostNameText;
    }
    public void set
HostNameText(RichInputText hostNameText) {
        this.
hostNameText= hostNameText;
    }


2) Add the ValueChangeListner in the SelectOneChoice , I am giving the method name as refreshHostname

jsff Code 

<af:selectOneChoice value="#{bindings.StringValue1.inputValue}"
                              label="Environment"
                              required="#{bindings.StringValue1.hints.mandatory}"
                              shortDesc="#{bindings.StringValue1.hints.tooltip}"
                              id="soc8"
                              valueChangeListener="#{backingBeanScope.
SampleBean.refreshHostname}"
                              autoSubmit="true">
            <f:selectItems value="#{bindings.StringValue1.items}" id="si8" />
          </af:selectOneChoice>

Note: Make sure that autoSubmit is set true, otherwise the value change listener will not be called


3) In the Bean method, add the code for partial triggers.

  Bean method code.

    public void refreshHostname(ValueChangeEvent valueChangeEvent) {
        // Add event code here...
       // Evaluate the bindings before fetching the SelectOneChoice value
        ADFUtil.setEL("#{bindings.StringValue1.inputValue}",valueChangeEvent.getNewValue());
        AdfFacesContext ctx = AdfFacesContext.getCurrentInstance();
        BindingContext bctx = BindingContext.getCurrent();
        String temp = valueChangeEvent.getNewValue().toString();
        BindingContainer bindings = bctx.getCurrentBindingsEntry();
        AttributeBinding hostNameBinding =                (AttributeBinding)bindings.getControlBinding("StringValue1");
        hostName = hostNameBinding.getInputValue().toString();
        if(hostName == null || hostName == ""){
            hostNameText.setDisabled(false);
            hostNameText.setRendered(true);
            ctx.addPartialTarget(hostNameText);
        }else{
            hostNameText.setDisabled(true);
            ctx.addPartialTarget(hostNameText);
        }
    }

ADFUtil Evaluate code to Evaluate the bindings.

    public static void setEL(String el, Object val) {
        FacesContext facesContext = FacesContext.getCurrentInstance();
        ELContext elContext = facesContext.getELContext();
        ExpressionFactory expressionFactory =
            facesContext.getApplication().getExpressionFactory();
        ValueExpression exp =
            expressionFactory.createValueExpression(elContext, el,
                                                    Object.class);

        exp.setValue(elContext, val);
    }


Please Note that: Before fetching the SelectOneChoice value in the bean method.
Evaluate the Bindings of the SelectOneChoice to fetch the latest value selected, otherwise you will end up with the previous value selected from the dropdown.