Tuesday, 3 September 2013

How to generated default values for the PK's

If we want to generate the default values for the PK's, there are many options to do that. I will show in 2 ways to generate the PK's


1) Open the Entity Object, and select the unique option and Primary Key option as show in the below image
It will generate the Random numbers, starting from 1.


2) If you want to generate the numbers sequentially not randomly, use sequences. Follow below steps to generate default values for PK using sequences.

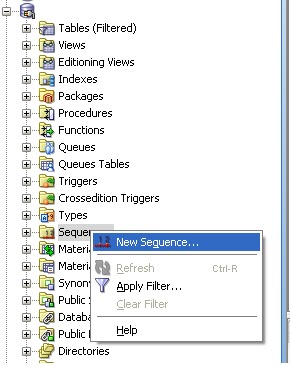
i) Go to the SQL Developer, expand the DB and right click on the Sequncee to create new sequence as in shown below image.
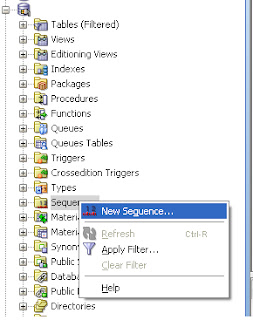
ii) In the opened sequence pop-up, specify the values as you want . Press OK to complete.


iii) Now create a trigger fro the sequence which you have created.

CREATE OR REPLACE TRIGGER department_pk
       BEFORE INSERT
        ON Department
              FOR EACH ROW
                  BEGIN
                        SELECT SAMPLE_SEQ.nextval
                        INTO :new.Department_id
                  FROM dual;
                  END;


department_pk is the trigger name, Department is the table name , SAMPLE_SEQ is the sequence we have created. Department_id is the PK column name

iv) Now go to the Entity Object. open the attribute, and select the data type as DBSequence, then you can see the option to enter the Sequence name which you have created at the DB side. Enter the DB sequence name and press Ok.


And you can start using it.


Wednesday, 3 July 2013

Conditional based Enabling and Disabling the fields in ADF

I have requirement to make the Text field as enable and disable based on the results of the other fields.

I have drop down with the values, and text box side to it. In ADF for LOV's we cannot enter the user inputs.

Below image describes the UI which i want.

When i select the any of the Environment, the text box needs to be disabled, when i select the blank value, the text need to be enable to enter the use inputs.
 We can achieve this by below steps.

1) Go the binding property of the textField, and bind it to the Bean class. In the bean class Setters and getters methods gets create

Textfield Code in jsff

  <af:inputText label="" id="it2"
                disabled="#{bindings.StringValue1.inputValue != ''}"
                binding="#{backingBeanScope.SampleBean.hostNameText}"/>
        </af:panelFormLayout>

  Bean class Code after binding the textfield.

   private RichInputText hostNameText;

    public RichInputText getHostNameText() {
        return hostNameText;
    }
    public void set
HostNameText(RichInputText hostNameText) {
        this.
hostNameText= hostNameText;
    }


2) Add the ValueChangeListner in the SelectOneChoice , I am giving the method name as refreshHostname

jsff Code 

<af:selectOneChoice value="#{bindings.StringValue1.inputValue}"
                              label="Environment"
                              required="#{bindings.StringValue1.hints.mandatory}"
                              shortDesc="#{bindings.StringValue1.hints.tooltip}"
                              id="soc8"
                              valueChangeListener="#{backingBeanScope.
SampleBean.refreshHostname}"
                              autoSubmit="true">
            <f:selectItems value="#{bindings.StringValue1.items}" id="si8" />
          </af:selectOneChoice>

Note: Make sure that autoSubmit is set true, otherwise the value change listener will not be called


3) In the Bean method, add the code for partial triggers.

  Bean method code.

    public void refreshHostname(ValueChangeEvent valueChangeEvent) {
        // Add event code here...
       // Evaluate the bindings before fetching the SelectOneChoice value
        ADFUtil.setEL("#{bindings.StringValue1.inputValue}",valueChangeEvent.getNewValue());
        AdfFacesContext ctx = AdfFacesContext.getCurrentInstance();
        BindingContext bctx = BindingContext.getCurrent();
        String temp = valueChangeEvent.getNewValue().toString();
        BindingContainer bindings = bctx.getCurrentBindingsEntry();
        AttributeBinding hostNameBinding =                (AttributeBinding)bindings.getControlBinding("StringValue1");
        hostName = hostNameBinding.getInputValue().toString();
        if(hostName == null || hostName == ""){
            hostNameText.setDisabled(false);
            hostNameText.setRendered(true);
            ctx.addPartialTarget(hostNameText);
        }else{
            hostNameText.setDisabled(true);
            ctx.addPartialTarget(hostNameText);
        }
    }

ADFUtil Evaluate code to Evaluate the bindings.

    public static void setEL(String el, Object val) {
        FacesContext facesContext = FacesContext.getCurrentInstance();
        ELContext elContext = facesContext.getELContext();
        ExpressionFactory expressionFactory =
            facesContext.getApplication().getExpressionFactory();
        ValueExpression exp =
            expressionFactory.createValueExpression(elContext, el,
                                                    Object.class);

        exp.setValue(elContext, val);
    }


Please Note that: Before fetching the SelectOneChoice value in the bean method.
Evaluate the Bindings of the SelectOneChoice to fetch the latest value selected, otherwise you will end up with the previous value selected from the dropdown.

Tuesday, 28 May 2013

How to get all the selected rows from a table in ADF.

How get all the selected rows from the UI ADF table.

For example you want to print all the departments which you have selected in the UI..
 
1. In the Table property inspector make rowSelection="multiple". And
Go to the Binding in Advanced option. Select the managed bean (or create new managed Bean) where you want to access this this Table. And create new property. (just give one new name)


Like below it will generate the code in the managed bean for the RichTable.

   private RichTable departmentTable;

   public void setDepartmentTable(RichTable departmentTable) {
        this.departmentTable = departmentTable;
    }
    public RichTable getDepartmentTable() {
        return departmentTable;
    }

2. Now you can access the selected rows from the table using below code.

RowKeySet selectedRowKeySet = this.getDepartmentTable().getSelectedRowKeys();
System.out.println("Number of rows:"+ selectedRowKeySet.size());

Using "selectedRowKeySet" you can iterate and get all the department data by rowwise

You can write this code in the SelctionListner of the Table itself so that if you want to perform any operations on selction of rows. as shown below.

FacesContext fc =FacesContext.getCurrentInstance();
RowKeySet selectedRowKeySet = this.getDepartmentTable().getSelectedRowKeys();
       
ExpressionFactory ef = fc.getApplication().getExpressionFactory();
 MethodExpression me = ef.createMethodExpression(fc.getELContext(),       "#{bindings.DepartmentVO1.collectionModel.makeCurrent}", null,
                                                     new Class[] { SelectionEvent.class });
        me.invoke(fc.getELContext(), new Object[] { selectionEvent });
        System.out.println("Number of rows:"+ selectedRowKeySet.size());

This works properly even if you have the dependent fragments. Like if you have Employee fragment depend on Departments selection.


The image is shown below where you have selected multiple rows.


Wednesday, 22 May 2013

How to show the pop-up by programmatically

Recently i was working one feature in ADF, where i wanted to show the pop-up programmatically.  I searched in the net but could'nt find the proper solution. So thought of posting this solution.


You can display the pop-up easily using <af:showPopupBehavior triggerType="action" popupId=":::p2"/>.
But in some situation if you want to do through Managed bean, follow the below procedure.

1. Add the popup component to your jsff (fragment page) with the dialog box in it, with the whatever message you want.


2. In the managed bean instantiate an Object of RichPopup with the setters and getters method, Below is the Managed bean code fragment for showing the Popup.

 public class ShowPopUp{
    private RichPopup richpopupId;
   
    public void setRichpopupId(RichPopup richpopupId) {
        this.richpopupId = richpopupId;
    }

    public RichPopup getRichpopupId() {
        return richpopupId;

  public void showPopup(){

  String popupId="p1";
  FacesContext context = FacesContext.getCurrentInstance();
  StringBuilder script = new StringBuilder();
  ExtendedRenderKitService extRenderKitSrvc = Service.getRenderKitService(context,            ExtendedRenderKitService.class);
  script.append("var popup = AdfPage.PAGE.findComponent('"+popupId+ "'); ").append("popup.show();");
  extRenderKitSrvc.addScript(context, script.toString());

}
}
 
In the above code String popupId="p1"; , p1 is the Id of the popup which you have added in 1st step.

3. Now go to the popup in the structure window of the jsff page, then go to the Advanced option in the Property inspector. In the Binding bind it to the "richpopupId" of the managed bean.